I make no claims for originality.. I first saw this kind of thing in a WD mag donkeys years ago...
As part of the build I had planned to do it as a ‘how to’ too, so took a bunch of pictures as I progressed... I’ve done this in part as I like scratch building anyway... but also as a post so you get some ideas of what you can do with a range of products we now stock! :)
To Start off... you'll need some ~5mm thick foamcard or foamboard...call it what you will... a craft knife... cutting mat ... and a steel rule.
Measure and cut out 4 10cm x 10cm squares.
(Note: you could use cheaper material like MDF, but foamboard is so much easier and quicker to work with)
Using PVA glue , plue the sides together to make a cube shape and use dressmaking pins to hold together while it glues.
Cut out another Square and glue it down on top to make a cube...
One dry (I'd leave overnight to be sure)... cut out some L Angle styrene from Evergreen and glue it to cover the corners...
I used super glue and accelerator
The get some Rod styrene and cut little disc of it off the end and keep working till you have a pile of discs... approx 1-2mm thick.
Using plastic glue, glue these in place along the Angle styrene edges... Use another L Angle fitted edge of to make it like like the box is fastened to floor....
Next step was big pipes... I paid a visit to local plumbing merchant ad bought some L Angles and a some straight connectors...I think they were ABS plastic. These are approx 1" Dia. I then was fortunate to have some plastic (as it turned out Acrylic) discs a mate had left over after Laser cutting out some circles for an model he was making for work. They were a perfect fit for the pump parts with just enough overlap to allow more rivets. I use a new glue we have in stock called Plastic Magic, which glues just about any plastics together... it didn't do anything to the acrylic, but it did melt the ABS plastic pipe end enough for it to stick to the acrylic... same with the rivet discs made from the styrene rod.
Same for adding on the outlet pipe which was a plumbing straight connector...
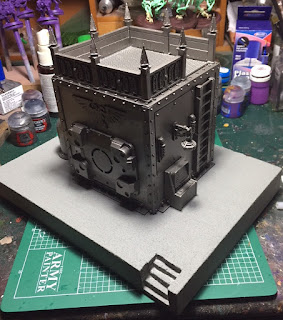
So we've got the shell made and the rough outline making sense. Now I had a wonder about, 'do I want models up on top'... models always want to be up high to shoot, so it was a no brainer really...
Deciding on a look for the top, i used the plastic crochet mesh again as this just works for Sci-fi flooring... Cut out a square and super glued it on. Thinking troops would be exposed up there best to give them some cover, so some left over imperial wall sections from the Imperial Sector set from my bitz box came in nicely. Admittedly I did then have to chop of some of the top level rivets to get it to fit, but that's what happens as you make things up as you go along... its half the fun too... The Imperial walls also gave the whole a good Imperium look.
Of course the troops would need to get up top so would need a ladder... this was again made from some spare parts from the imperial sector sets ad some more of the styrene rod cut into ladder rungs and glued into place. More embellishments were made to the 'box'... more imperial sector bits and bobs, and a make had done some 3D printing and found a file for an Imperial eagle and also a computer console... so these were printed out and super-glued on. Another lump of odd shape plastic was a part from a sparky's box of supplies... apparently its a J-something or other ... I tweaked it a bit adding discs and rectangles cut from styrene sheet.
more imperial eagles and more rivet strips were added...
We now need a base for this terrain feature, and I envisaged it sitting atop a concrete base... out came an off-cut of Sytrofoam or dense blue foam as its generically know. This was cut into a rectangular shape, checking it was big enough for model placement all around. And a set of steps was cut into one corner...
I also figured a spare lamp post would be useful and add to the whole look...
Once happy with the build the metal areas of the pump section were sprayed with Leadbelcher , whilst the concrete base, was painted in a light grey sand textured paint mixed at Mitre 10.
Now to sit the whole thing in the terrain base... and I used a sheet of 3mm MDF, cut into a rectangle. I mounted the concrete base at one end and built up the sides with some spare dense foam. I then went around this with some air drying modelling clay, in this case; DAS. This defined the pool area where the water discharge would go...
Testing how it looks... While that was drying I nuln oiled the metal pump top, with some Agrax earthshade spotted around...
I then painted the whole thing dark brown, then tried out the "water look" Acetate sheet we got in from Greenstuff world... I had thought about going the whole hog and using the more expensive though arguably more realistic epoxy resin stuff you mix and pour... but I thought for a simple easy cheap demo of water effects the sheet would do just fine.
Having made our pool, we didn't want anyone blundering into it, so I surrounded it with some chain-link fencing. This was made out of Aluminium mesh, cut into strips and superglued into posts cut from H Column styrene. The the mesh was then chopped at to make it look torn and battle worn in places... The whole was then again sprayed in Leadbelcher and Nuln Oil washed.
Now this was the only tricky bit, sourcing materials wise... I had a bunch of the mesh in my bitz box from back in the UK times... but I needed more to complete this build, figured I tried the local car shops; Repco and SuperCheap... the guys at Repco looked at mt like i was from Venus... at least one of the guys at Supercheap had heard of what I wanted, but they didnt stock it.... hmmmm ... oh well... send email to father in UK... "Dad can you get me some of that Aluminium Mesh from Halfords"... I'd found it on their website, but they wouldn't ship here, Doh! So Dad had to go an buy some and send it over, the shipping was more than the mesh... a couple of quid a pack...
So with everything coming along nicely, we got to see how it was all looking...
Then I noticed a small problem... as the Das clay had dried it had contracted slightly enough to warp the mdf... so out came the saw and I sliced through the mdf... and filled the cuts with vallejo plastic putty and painted it over again...
I also painted in the pools surface going for a graduated look going darker in the middle and some greenery at the edges...
The concrete base was also washed with a thinned down dark brown wash to grubby it up a bit.
I then need to add some water pouring from the outlet pipe and this was done using Woodland Scenics Water effects. Just paint some onto a piece of plastic and make a flowing pattern in it with a paint brush or tool. If goes on like white toothpaste but dries clear. It can then be peeled off and put into position. Secure it place using more of the water effects. I haven't done this just yet as I have not glued down the acetate sheet yet.
The next thing playing on my mind was again the top of the pump. Why would a civilian need to go up top? Maybe there's an inspection cover up there to get into... So I made a manhole cover out of another acrylic disc and more styrene and, sprayed and washed it and super-glued it into place...
So that's where I am up to... I still need to glue down the acetate, glue into place the water flow, glue down the fencing... and add some gravel flock to the edge.
I also need to finish painting the light fittings and computer console on the pump...
Not too far to go, the end is in sight, and it hasnt taken that long, nor cost a fortune and has been a very enjoyable model making project :)
I'll put up another post once finished with pics...


